Configuring MX, SPF, DKIM, and DMARC records is crucial for ensuring high email deliverability, preventing spoofing, and improving email security. Follow this step-by-step guide to add these records for your domain in DirectAdmin.
How to change MX, SPF, DKIM, and DMARC Records in DirectAdmin
In this article, we will cover how to add MX, SPF, DKIM, and DMARC records for your domain in YES DOMAIN.
To ensure proper email authentication, high email deliverability, and protection against email spoofing, it is recommended to configure SPF, DKIM, and DMARC records for your domain.
Note: These steps will only work if your domain is pointed to YES DOMAIN nameservers. If your domain is using third-party nameservers, you will need to update the DNS records manually. Learn how to point your domain to YES DOMAIN.
Steps to Add Email DNS Records
Step 1: Log in to DirectAdmin
- Visit your DirectAdmin Control Panel.
- Enter your login credentials and click Sign In.
- Select your Domain name (Example – yesdomain.io )
How to Register & Login to Client Area Read This.
https://yesdomain.io/kb/how-to-register-login-to-client-area/
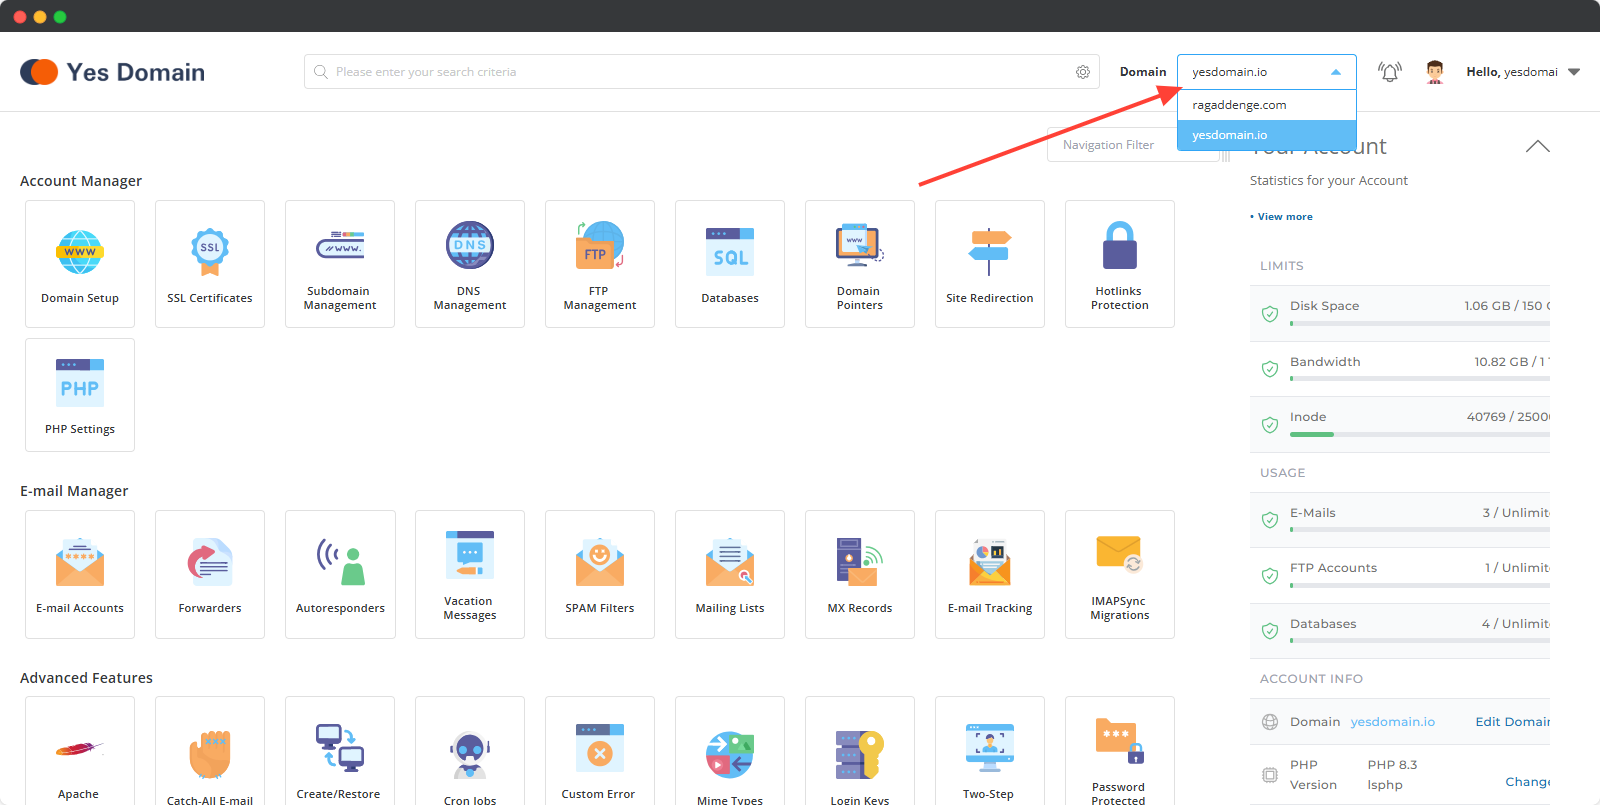
Step 2: Configure MX Records
MX (Mail Exchange) records define the mail servers responsible for receiving emails for your domain.
For Yes Domain Email Users:
- Go to Email Manager > MX Records.
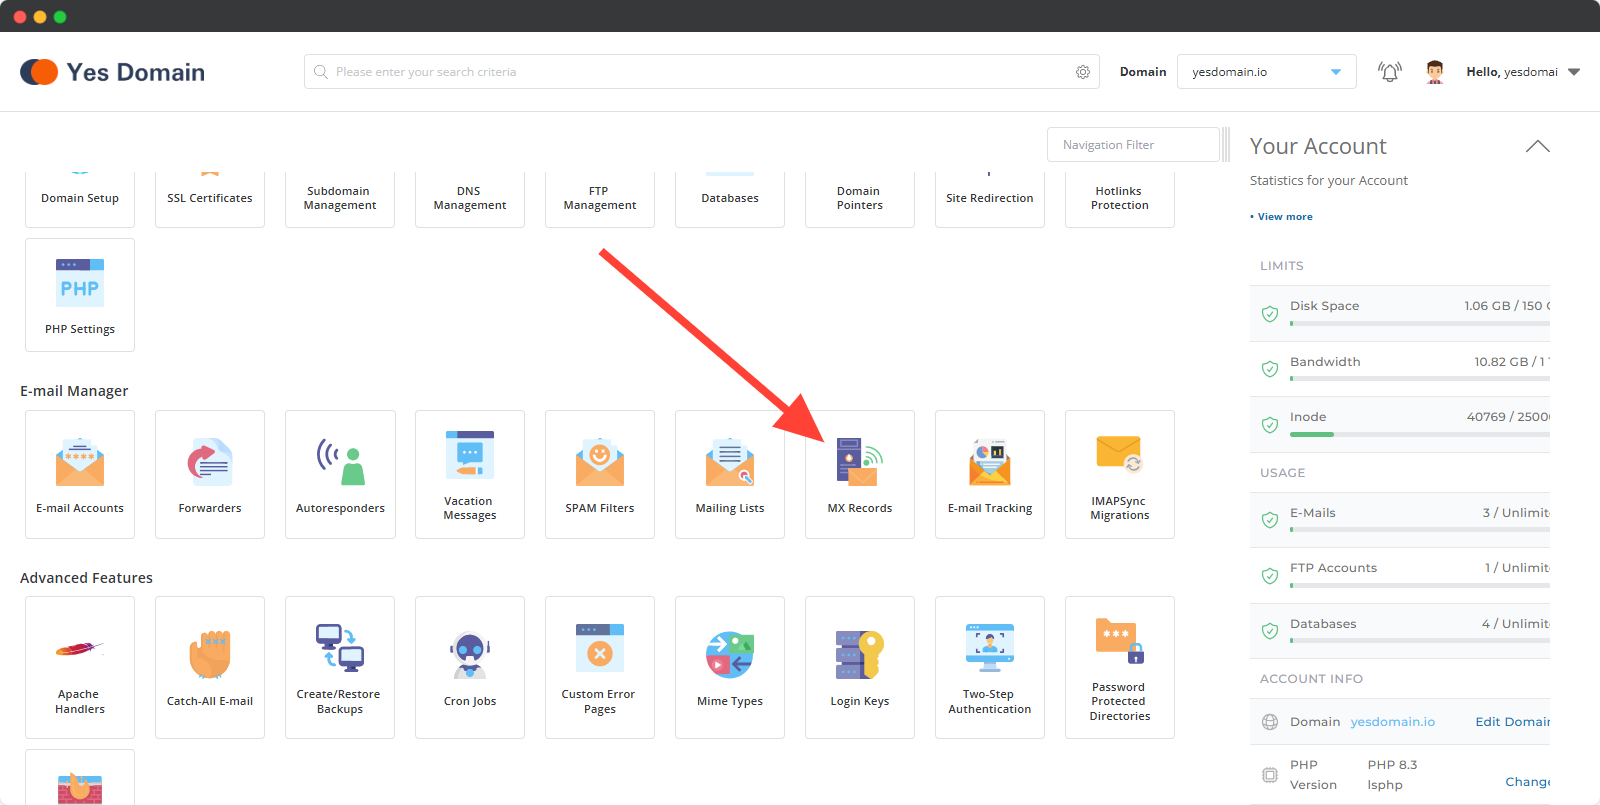
2) Adding MX Records
For YES DOMAIN Email Hosting Users
If you are using YES DOMAIN Cloud Hosting email accounts, follow these steps:
✅ Keep the default MX records as they are.
✅ Ensure the option “Use this server to handle my emails” is checked.
No further action is required.
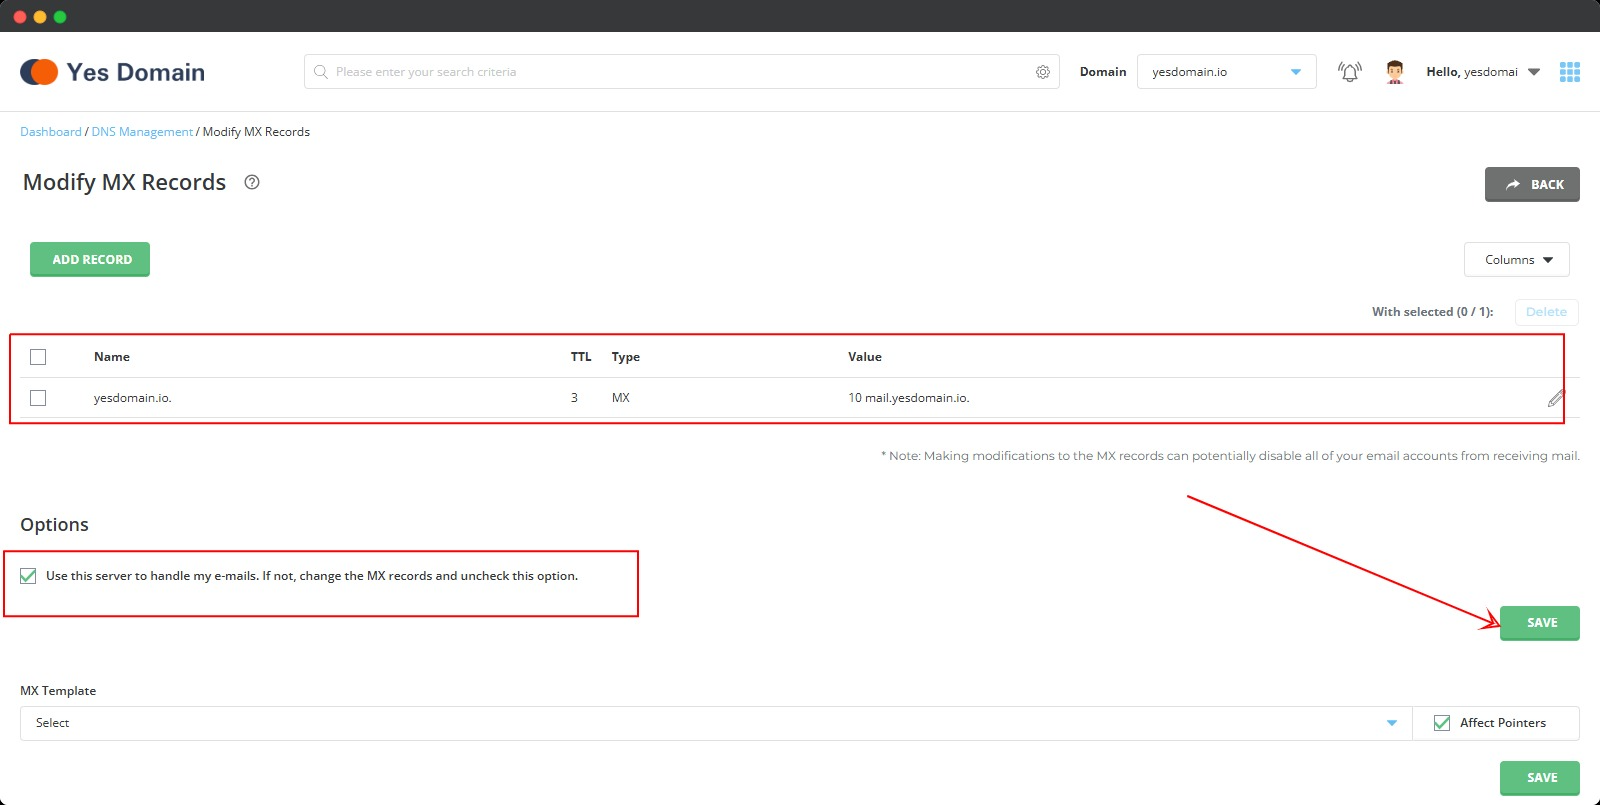
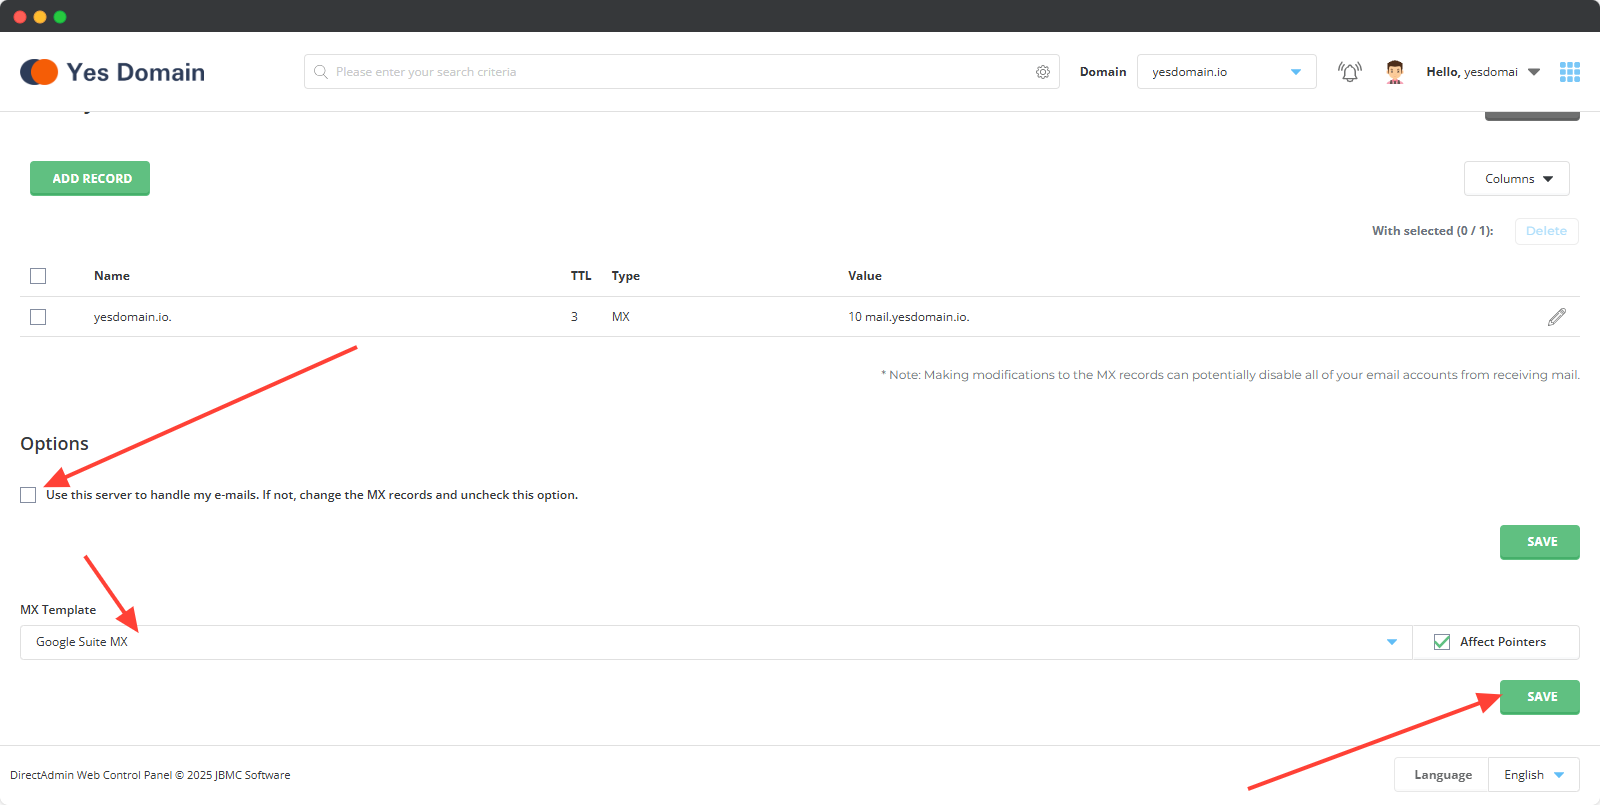
For Third-Party Email Providers (Google Workspace, Zoho Mail, Microsoft 365, etc.)
If you are using external email providers:
- Uncheck the option “Use this server to handle my emails”
- Select the respective MX template (e.g., Google Workspace MX, Zoho Mail MX)
- Click ‘Save’
For Custom Email Providers
If you are using a custom mail provider:
- Delete the existing MX records
- Click ‘Add Record’
- Enter the MX records provided by your email service
- Click ‘Save’
📌 Related Guide: How to Configure Google Workspace with DirectAdmin
3) Adding SPF Record
- Go to YES DOMAIN Control Panel → DNS Management
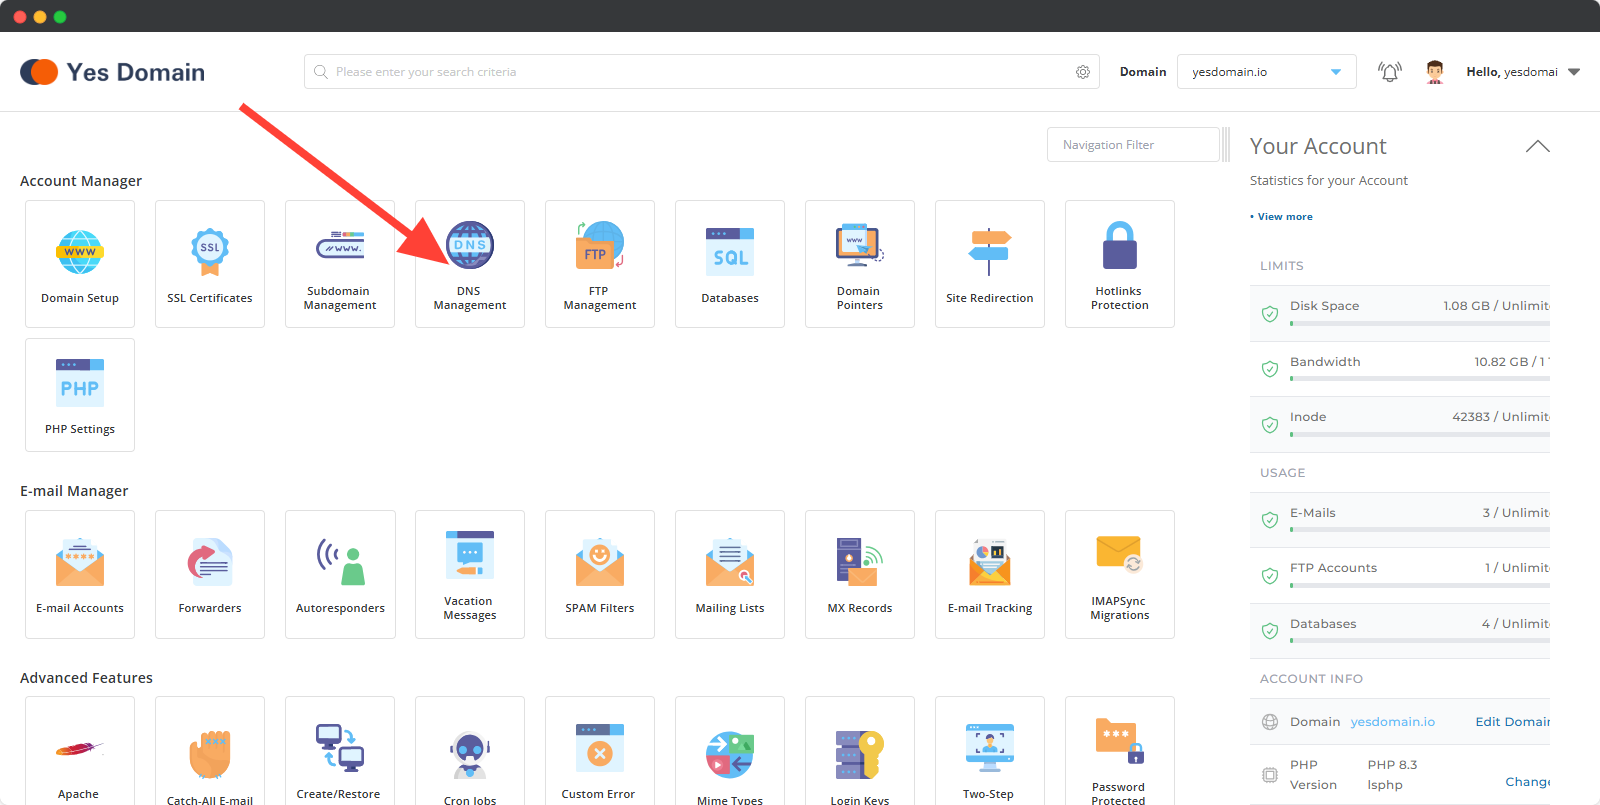
- see upar screenshort
- Click ‘Add Record’
- Select TXT under Record Type
- Enter your email provider’s SPF Record Value
- Click ‘Add’
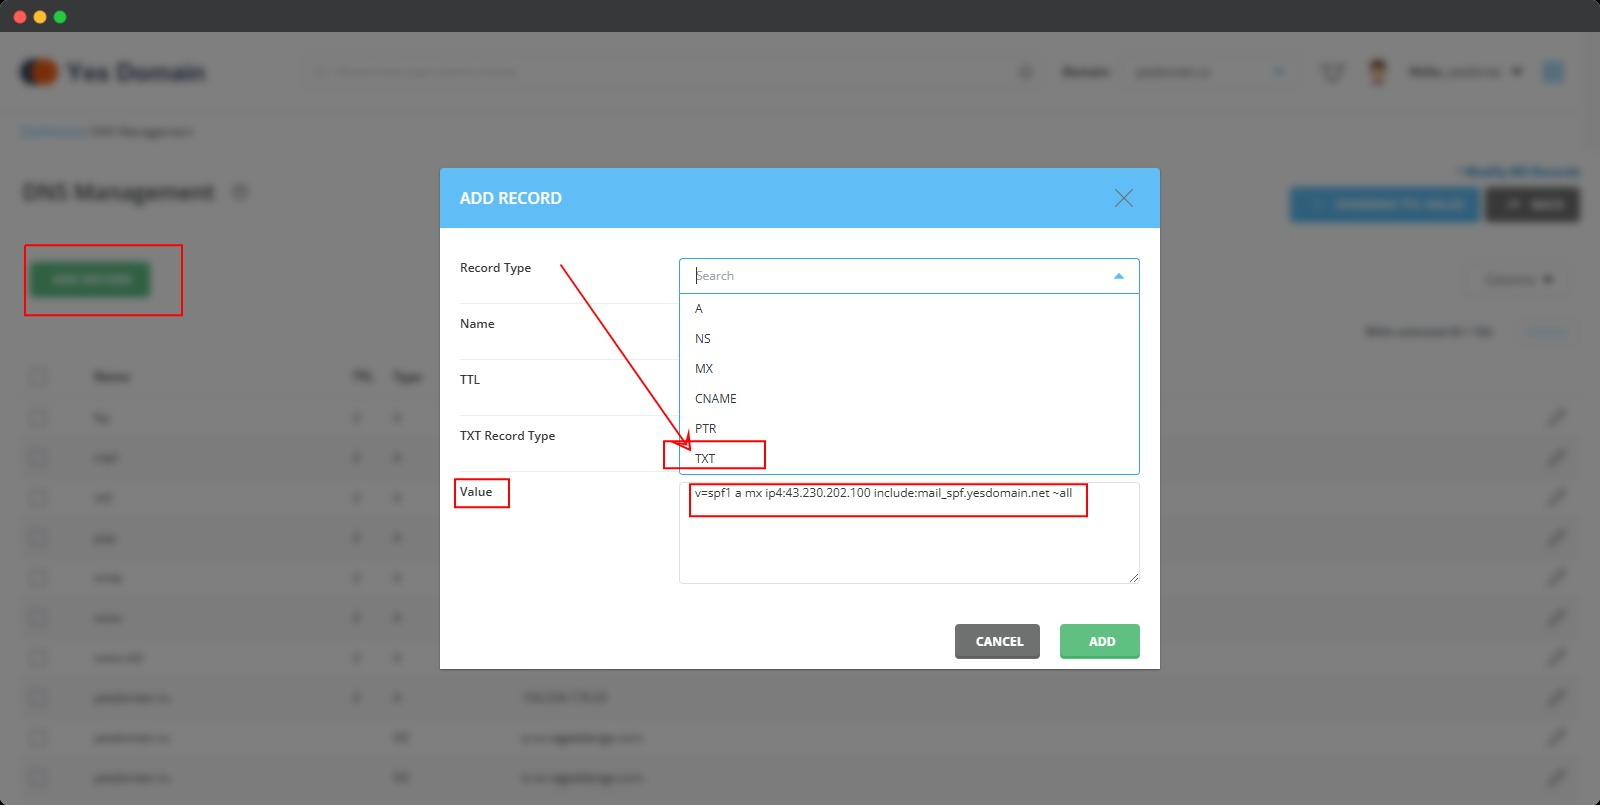
For YES DOMAIN Email Hosting Users:
Include this tag in your SPF record for proper email delivery:
include:mail_spf.yesdomain.net
✅ Example SPF Record:
v=spf1 a mx ip4:43.230.202.100 include:mail_spf.yesdomain.net ~all
4) Adding DKIM Record
For YES DOMAIN Email Hosting Users
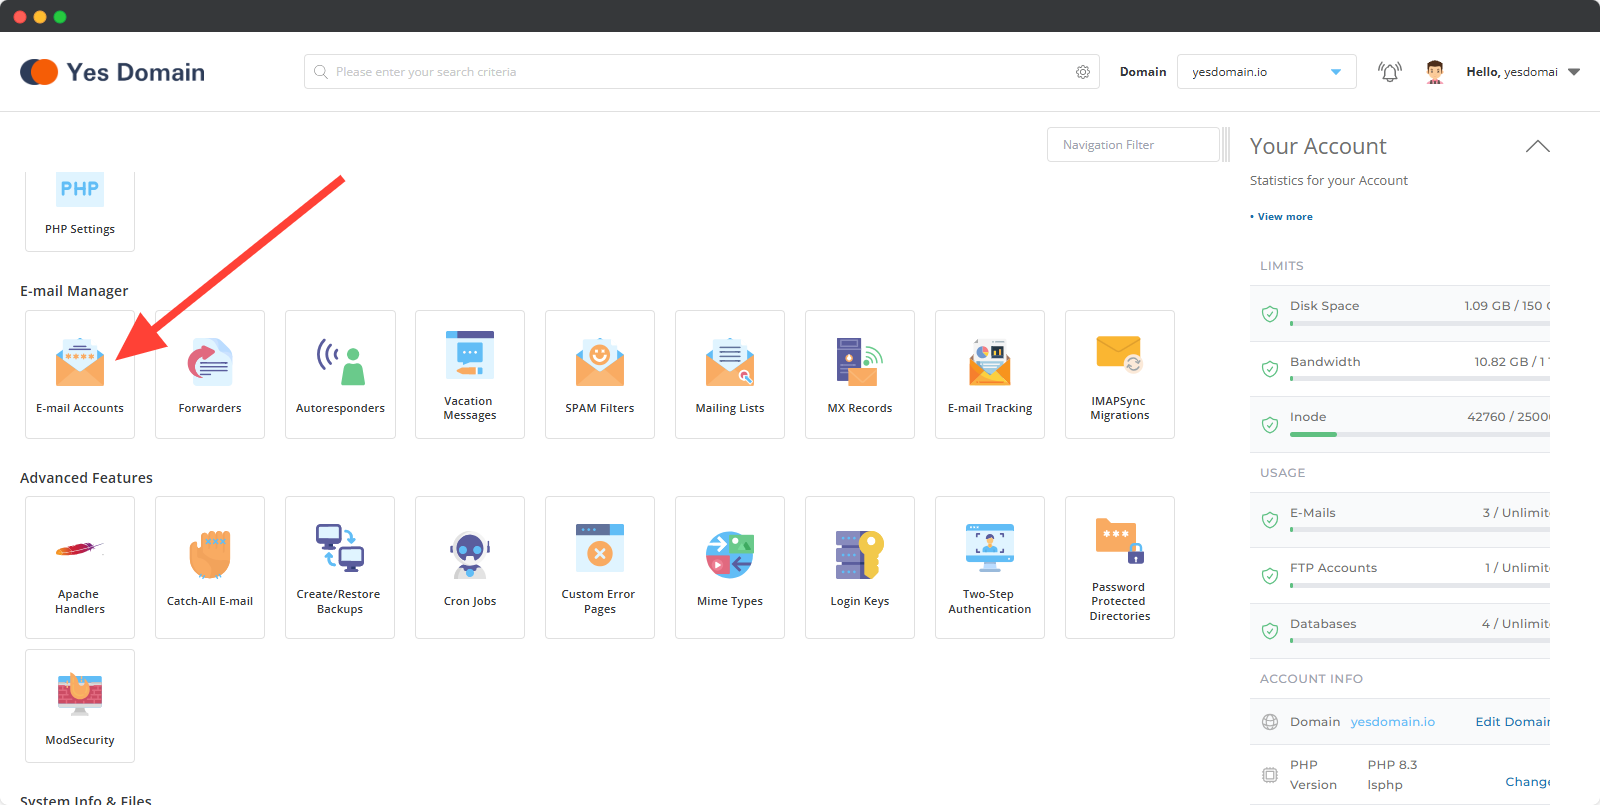
- Go to the Email Accounts section
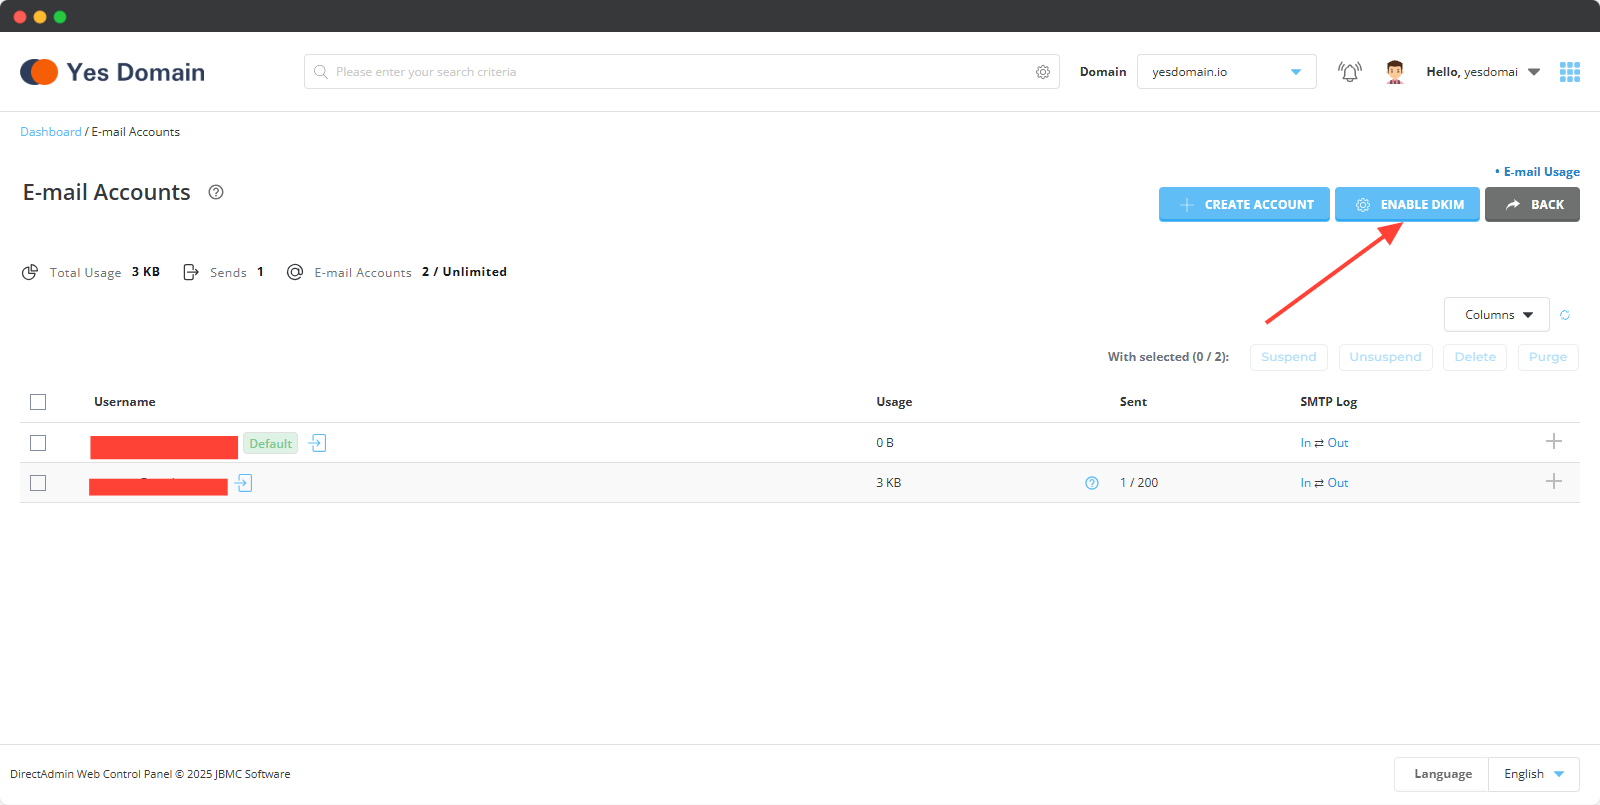
- Click ‘Enable DKIM’
This will automatically add the DKIM record for your domain.
For Other Email Providers
If your provider requires manual DKIM setup:
- Use a DKIM Record Generator (provided by your email provider)
- Copy the DKIM Record Name and DKIM Record Value
- Go to DNS Management → Click ‘Add Record’
- Select TXT under Record Type
- Enter the following details: Name:
default._domainkey.yourdomain.com
Value: (Paste the generated DKIM value) - Click ‘Save’
5) Adding DMARC Record
- Go to DNS Management → Click ‘Add Record’
- Select TXT under Record Type
- Enter the following DMARC Record Value:
v=DMARC1; p=reject; rua=mailto:webmaster@yourdomain.com
- Click ‘Save’
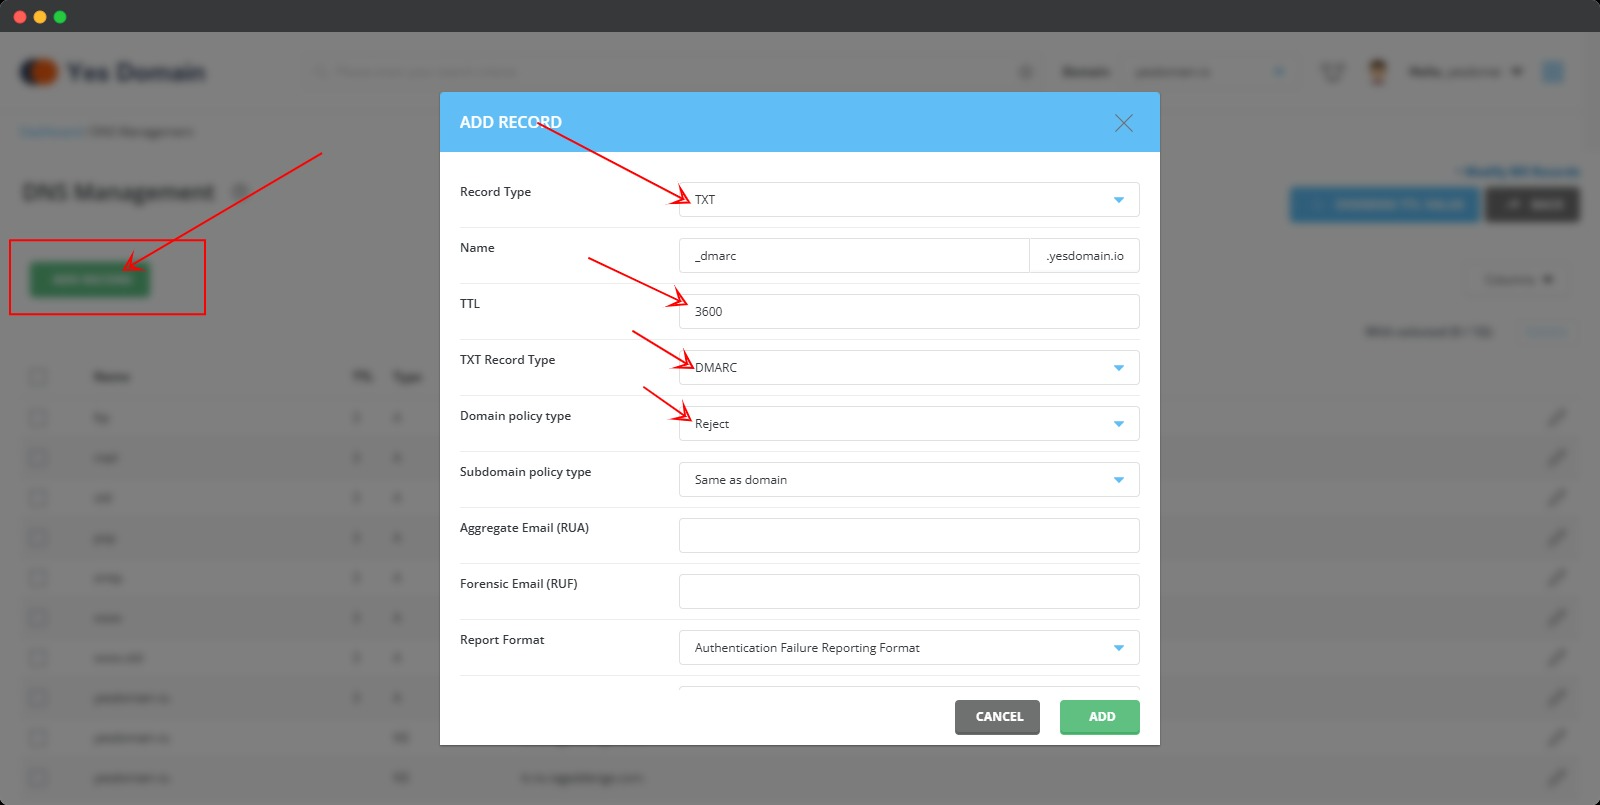
Understanding DMARC Policy Types:
- None (p=none): Only monitors email traffic, does not block any emails.
- Quarantine (p=quarantine): Suspicious emails are sent to spam/junk.
- Reject (p=reject): Blocks all unauthorized emails from being delivered.
✅ Recommended DMARC Setting: Use p=reject for maximum protection against email spoofing.
Step 6: Verify and Monitor Your DNS Changes
📌 Use these tools to check DNS propagation:
✅ MXToolbox – Check MX, SPF, DKIM, and DMARC.
✅ WhatsMyDNS – Check DNS record propagation globally.
⏳ DNS updates may take up to 48 hours to propagate.
Final Notes
⏳ DNS changes may take up to 48 hours to fully propagate.
✅ You can verify the records using a DNS propagation checker.
📌 Related Guide: How to Verify SPF Records
📌 Related Guide: How to Generate DKIM Records
Need Help? Contact Support
If you need assistance with setting up MX, SPF, DKIM, or DMARC records, feel free to contact YesDomain Support. 🚀
📌 Next Steps: